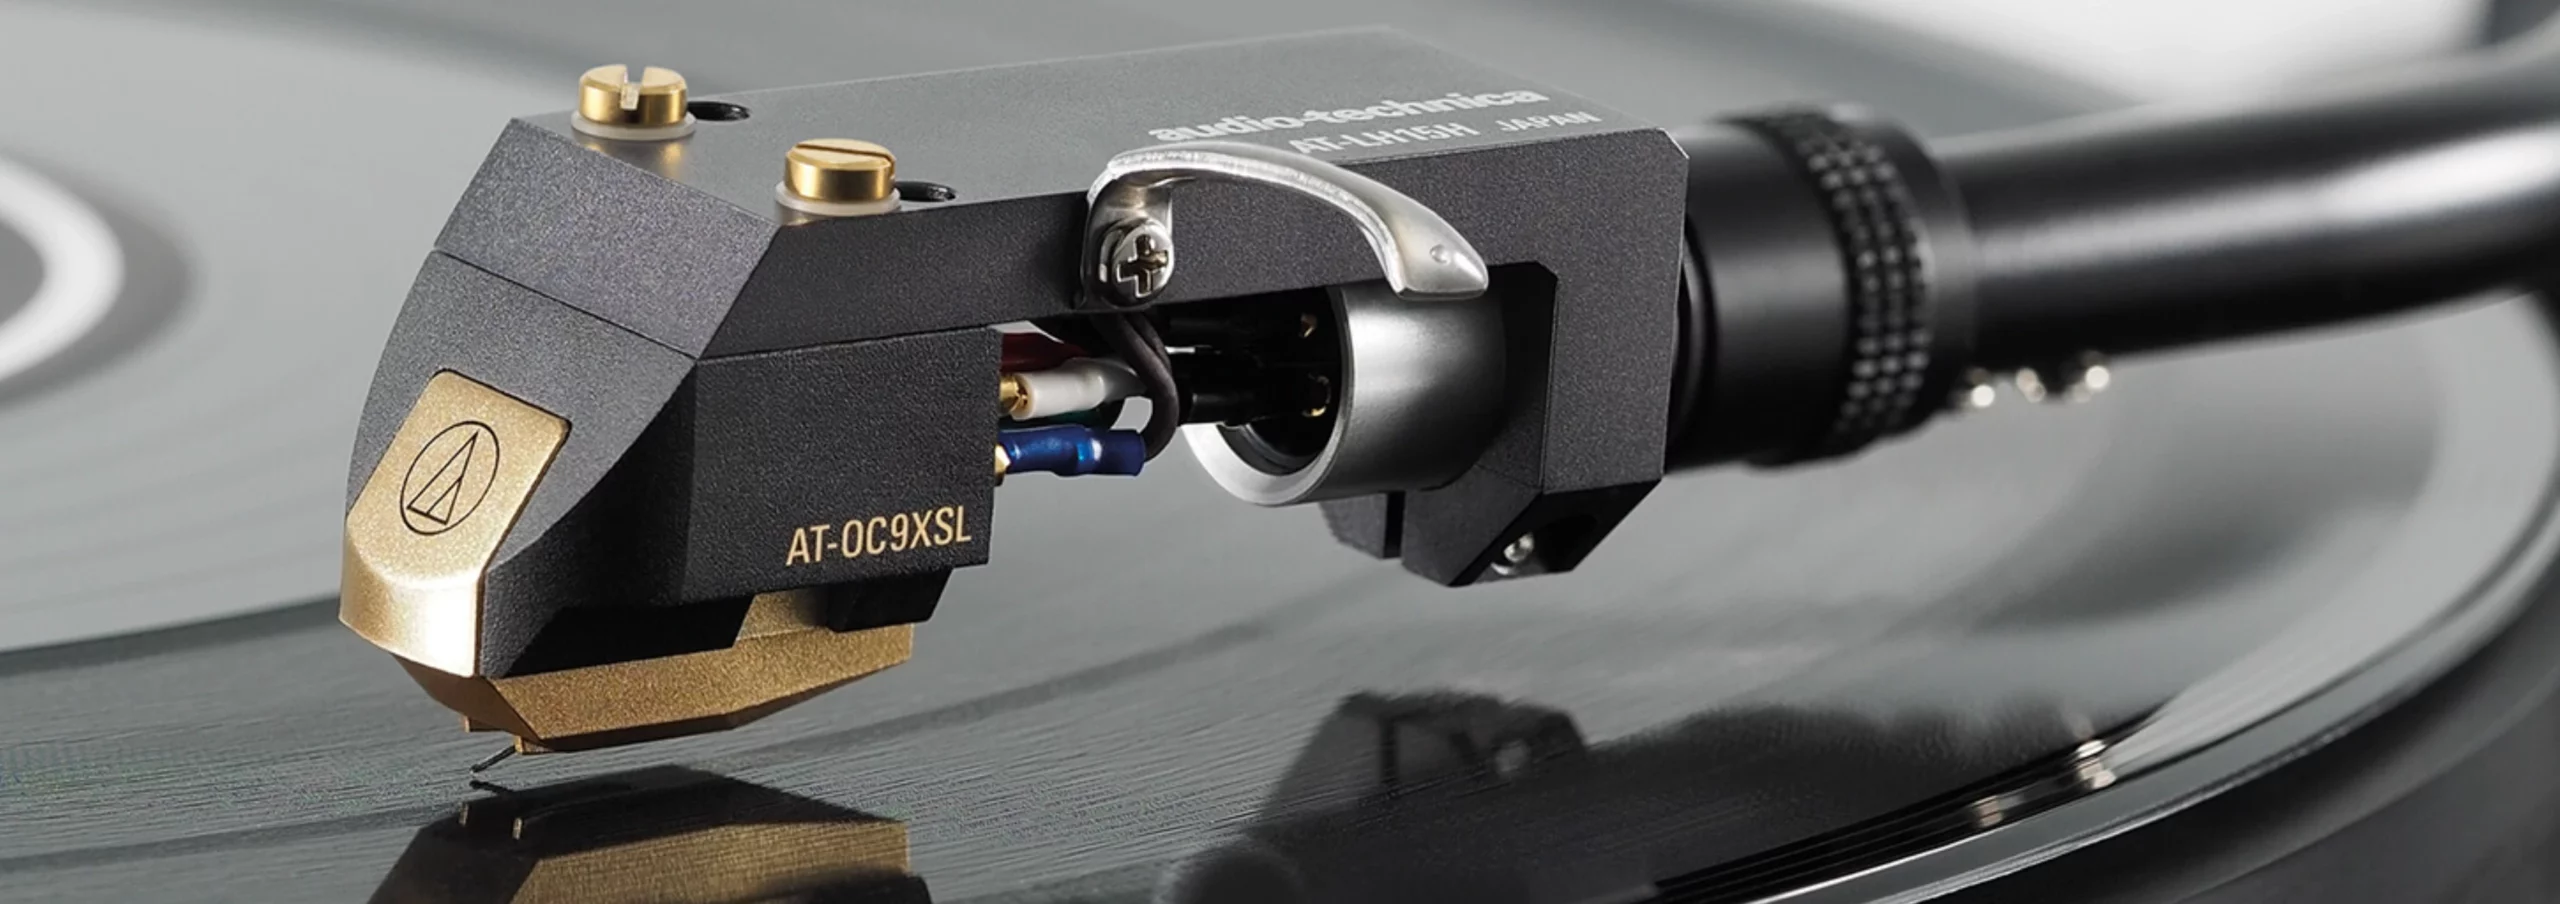
If you own an entry-level or mid-range turntable and your amplifier has a standard phono input, the short answer is this: a moving magnet (MM) cartridge with an elliptical stylus. It works with any phono stage, it lets you replace just the stylus when it wears out, and it is the biggest sound upgrade you can get for the money. Moving coil (MC) cartridges do sound better, but they need a dedicated phono stage and a turntable good enough to deserve one. And one thing matters more than whichever model you buy: the three setup adjustments covered at the end of this guide.
The cartridge is the small box at the end of the tonearm, and it is the only component in the whole chain that physically touches the music: its stylus rides the groove walls and turns those microscopic undulations into an electrical signal of just a few millivolts. Everything downstream – phono stage, amplifier, speakers – can only amplify whatever the cartridge managed to read in the first place. That is why, on a turntable, replacing it is the single most cost-effective upgrade there is.
MM vs MC: the first decision
There are two families of magnetic cartridges, and what separates them is which part actually moves inside. That one mechanical difference drives everything else: how much signal they put out, what phono stage they need, whether you can replace the stylus alone, and what they cost.
How each type works
In an MM (moving magnet), the stylus is attached to a tiny magnet that vibrates between two fixed coils, inducing a current in them. Because the coils are large and stationary, the output is comparatively high – typically 3 to 6 mV – and the moving assembly can be pulled off, which is why most MM cartridges let you buy a replacement stylus on its own.
An MC (moving coil) works the other way round: the coils are what move, attached to the stylus, inside a fixed magnetic field. Those coils have to be tiny so they don’t add mass, so they put out far less signal – 0.2 to 0.5 mV on low-output designs – but the moving assembly is so light that it tracks the groove more faithfully. The price of that lightness is that the stylus is not user-replaceable: when it wears out, the whole cartridge goes back for retipping, or you buy another one.
MM vs MC at a glance
| MM · moving magnet | MC · moving coil | |
|---|---|---|
| What moves | A magnet, between fixed coils | The coils, in a fixed field |
| Typical output | 3–6 mV | 0.2–0.5 mV (low output) 1.5–2.5 mV (high output) |
| Phono stage needed | Standard 47 kΩ input | Dedicated MC input: ~20 dB more gain, adjustable loading |
| Stylus replaceable on its own? | Yes, on nearly all | No: retipping or a new cartridge |
| Usual price | $70–350 | $400 and up |
| Who it’s for | Almost everyone | Systems already dialled in, with the right phono stage |
The detail that ruins the upgrade: your phono input
This is the mistake that sends most cartridges back to the shop. A cartridge cannot be plugged into a regular line input: it needs a phono stage, which both amplifies the signal and applies RIAA equalization. And not every phono stage suits every cartridge.
MM cartridges are designed for a 47 kΩ load, which is what every phono input on earth provides by default. They are also sensitive to capacitance from the cable and the input stage: most want somewhere between 100 and 300 pF in total, and with long interconnects it is easy to overshoot, which pushes a resonant peak down into the 8–15 kHz region and reads as splashy, hot treble. Low-output MC cartridges, by contrast, need roughly 20 dB more gain and a far lower load – 100 Ω is a sensible starting point when you don’t know the recommended figure. Plug a 0.3 mV MC into an MM input and you’ll get a faint whisper at full volume, and you’ll assume the cartridge arrived faulty.
There is a middle road that rarely gets mentioned: high-output MC cartridges, at around 2 mV, run happily into a standard MM input. They don’t give you everything a properly fed low-output MC does, but they let you hear what a moving coil sounds like without replacing your phono stage.
When is an MC actually worth it?
When it is no longer the weakest link. A $600 MC on a $300 turntable with a badly set-up arm sounds worse than a $180 MM mounted properly, because a highly resolving cartridge also resolves flaws: motor rumble, record warp, dirt in the groove. The sane order to spend money in is setup first (it’s free), then a better stylus, then a decent phono stage, and only then an MC.
Stylus profiles: from conical to Shibata
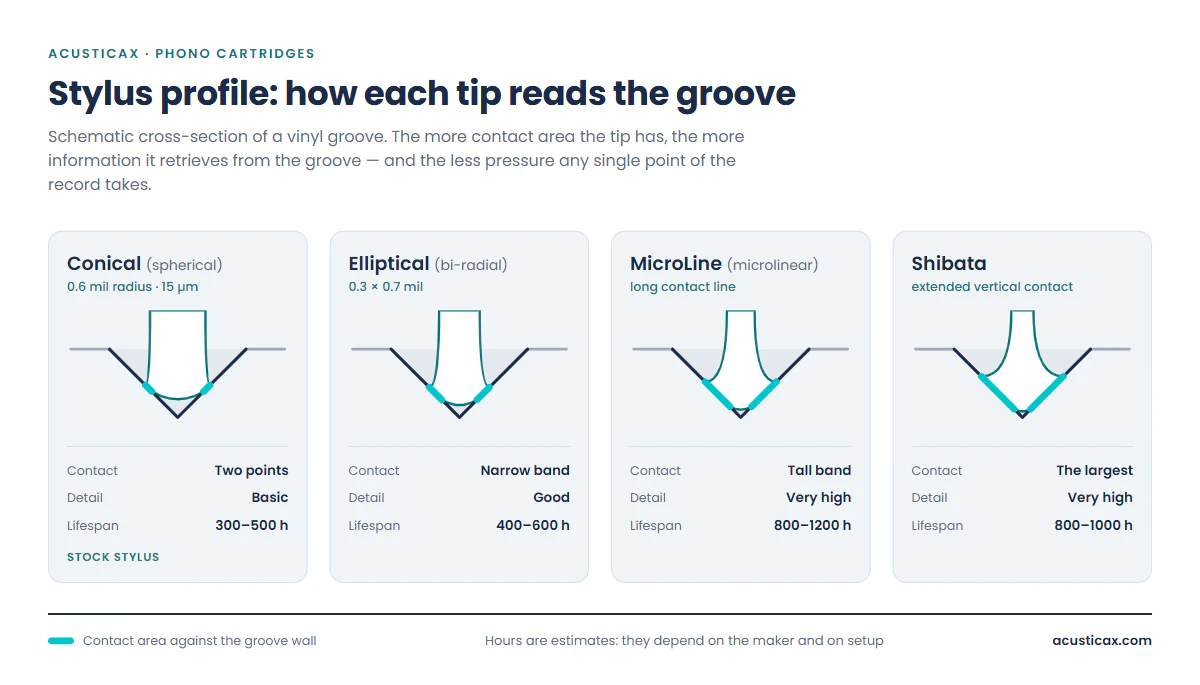
Here is something that surprises a lot of people: the shape of the tip affects what you hear more than the MM-versus-MC choice does. It is easy to see why once you look at how each tip sits in the groove, because they don’t all touch the same amount of it.
What actually changes from conical to elliptical
A conical tip (also called spherical) is a sphere with a radius of around 15 µm: it touches each groove wall at a single small point, fairly high up. It’s cheap, it forgives sloppy setup, and it’s what ships on almost every entry-level turntable. Its limits show up in the high frequencies and, above all, towards the end of each side – where the radius is smaller, the groove modulations are packed tighter and a round tip simply can’t fit into them. That is what people hear as inner-groove distortion.
An elliptical (or bi-radial) tip has two different radii: a larger one front-to-back and a much smaller one – around 0.3 mil – on the side that rides the wall. The contact patch goes from a point to a narrow band, and that band can read finer modulations. In practice you get cleaner highs, less sibilance on vocals, and a side B that holds together to the run-out. Because the bearing surface is larger, pressure per unit area drops, so it wears the record less at the same tracking force. It is by far the best-value upgrade there is: on many MM cartridges, the elliptical replacement stylus costs $30 to $60 more than the conical one.
MicroLine and Shibata: when they’re justified
Advanced profiles ( MicroLine, Shibata and relatives like Micro-Ridge and Fine Line ) take the idea to its limit: their flank is almost tangent to the groove wall, so the contact becomes a long vertical line. That buys two things. They retrieve high-frequency detail the others leave behind, and they spread wear over so much surface that they last two to three times longer: 800 to 1,200 hours against the 300–500 of a conical.
There’s an honest catch: they are fussy about setup. A long contact line only pays off if it is correctly oriented against the wall, which means careful alignment and a correct vertical angle. If you’re not going to use a protractor, don’t buy a MicroLine – you’ll be paying for precision you’re about to throw away, and a badly oriented line contact wears the groove faster than a conical would.
| Profile | Contact with the wall | Lifespan | When to pick it |
|---|---|---|---|
| Conical / spherical | Two points | 300–500 h | Casual use, entry-level decks, records in rough shape |
| Elliptical | Narrow band | 400–600 h | The default choice for most people |
| MicroLine | Tall band | 800–1200 h | If you’ll align with a protractor and keep records clean |
| Shibata | The largest | 800–1000 h | Dialled-in systems; excellent on spotless records |
Will it fit my turntable?
Almost any cartridge on the market physically fits almost any tonearm, because the half-inch standard is universal. The real question isn’t whether it fits, it’s whether it matches your arm. And that involves a figure most shops never explain.
Compliance and effective mass: the resonance of the pair
A tonearm and cartridge form a mass-and-spring system. The arm’s effective mass is the mass; the cartridge’s compliance – how soft its suspension is, in µm/mN – is the spring. Like any such system it has a resonant frequency, and you want it to land between 8 and 11 Hz (the tolerable limits run from 7 to 12 Hz).
That window isn’t arbitrary. Below 7 Hz the resonance moves into the territory of warped records and floor-borne vibration: the arm visibly pumps up and down on a dished record and the bass gets unstable. Above 12 Hz it creeps too close to the lowest musical frequencies, and what should be a mechanical resonance turns into an audible lift and a loss of grip in the bass.
The rule of thumb fits in one line: light arm, high compliance; heavy arm, low compliance. And there’s good news – most current domestic turntables use medium-mass arms of around 10–12 g, which pair well with medium-compliance cartridges (10–20 µm/mN), and that describes the majority of MM cartridges sold today. Buy something conventional for a conventional deck and you’ll be fine without doing any arithmetic. Trouble only shows up at the extremes: a very stiff MC in a light arm, or a very soft 1970s MM in a heavy one. Makers like Ortofon publish compliance for every model, and Audio-Technica has a guide to matching a cartridge to a turntable.
Mounting: half-inch, P-mount and clearance
The dominant standard is half-inch: two screws 12.7 mm apart holding the cartridge to the headshell. That’s what Rega, Pro-Ject, Technics, Audio-Technica and virtually everything else uses. The other family you may run into is P-mount (T4P), common on 1980s and 1990s decks: the cartridge plugs straight into the arm and is held by a single side screw, with no wiring and no alignment to do. Convenient, but it narrows your options drastically.
Check two physical things before you buy, too: the body height, because an unusually tall or short cartridge can leave you unable to get the arm parallel to the record, and the total weight, which has to fall inside the range your counterweight can balance. An 11 g cartridge on an arm designed for 5–8 g simply won’t balance.
If your turntable has a ceramic or fixed cartridge
Suitcase turntables and a good share of budget Bluetooth record players don’t use a magnetic cartridge at all – they use a ceramic (piezoelectric) one. Two symptoms give them away: they put out a huge signal that needs no phono stage, and they bear down on the groove with 3 to 5 grams of tracking force, when a decent magnetic cartridge works with less than half that. On these machines a better cartridge makes no sense: the arm has none of the necessary adjustments and the electronics aren’t expecting one. The next step here isn’t a new cartridge, it’s a new turntable.
What to buy for your turntable and budget
One rule before the table: don’t spend more on the cartridge than the turntable holding it is worth, unless you’re deliberately preparing for a deck upgrade. A cartridge can only read well if the platter spins steadily and the arm holds it still – which is what our guide on what actually makes one turntable sound better than another goes into.
| Your turntable | What to buy | Usual suspects |
|---|---|---|
| Suitcase or budget Bluetooth | Nothing. Save towards a different deck | – |
| Entry-level ($170–400) | An elliptical replacement stylus, if the model takes one | The brand’s own elliptical stylus ($70–100) |
| Mid-range ($450–900) | An elliptical or MicroLine MM ($120–280) | Ortofon 2M Blue · Nagaoka MP-110 / MP-200 · Audio-Technica VM95ML |
| High-end ($1,000+) with an MC input | A low-output MC | Denon DL-103 · Ortofon Quintet · Audio-Technica OC9XML |
Setup: the three adjustments that decide how it sounds
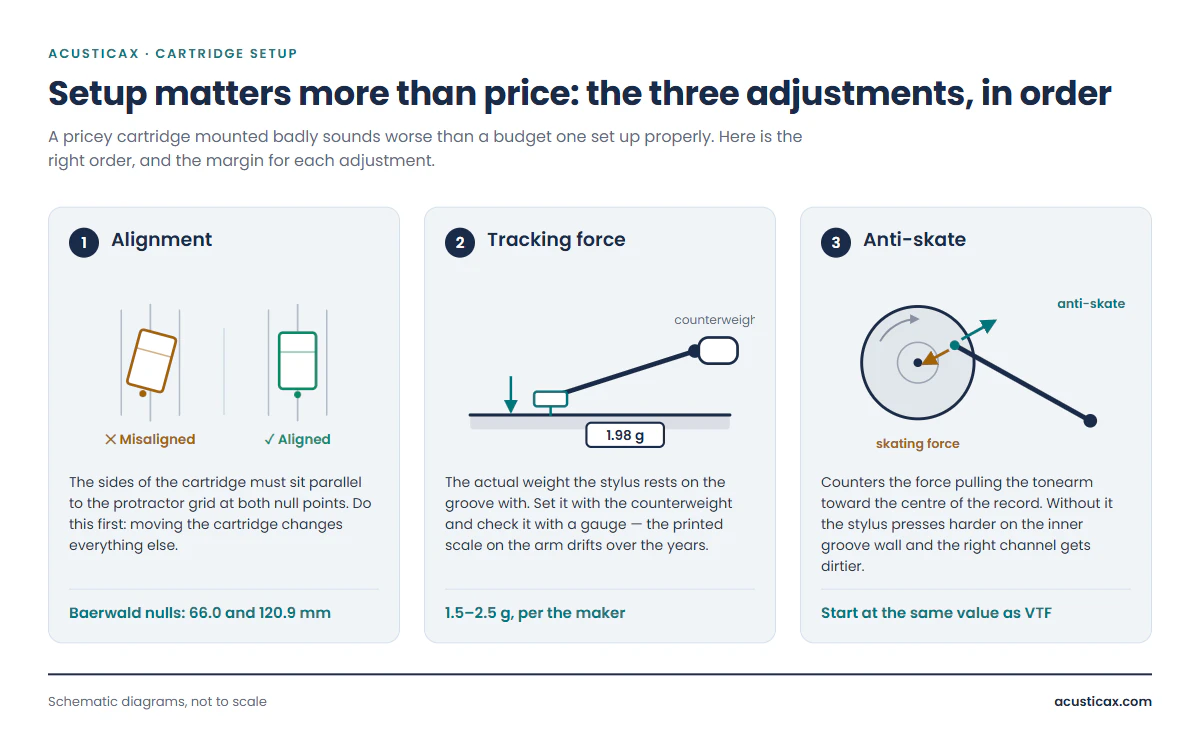
This is the part nearly everyone skips, and the part that makes the biggest difference. A $350 cartridge mounted badly sounds worse than a $90 one set up properly, and that’s not hyperbole: the three adjustments below govern distortion, channel balance and how fast your records wear out. Order matters, because each one depends on the last.
1 · Alignment: the two null points
Because a pivoted tonearm swings in an arc, the stylus sits perfectly tangent to the groove at only two radii on the record: the null points. Everywhere else there is a small, unavoidable tracking error, and a good alignment is simply one that puts that error where it does the least damage. The most widely used geometry is Baerwald, which places the nulls at 66.0 and 120.9 mm from the spindle. You don’t need to buy anything to find them: our printable cartridge alignment protractor generates the grid for Baerwald, Löfgren B or Stevenson geometry, and if you enter your tonearm’s mounting distance it also draws the actual arc your stylus travels. Print it at 100 % – never “fit to page” – and check the scale with a ruler before you trust it.
The adjustment itself means loosening the screws and sliding the cartridge forward or back in the headshell, plus a slight rotation, until at both null points the tip lands on the crosshair and the sides of the body sit parallel to the grid lines. It’s an iterative process: fixing one nudges the other out. Be patient, and only tighten the screws at the very end – firmly, but without force.
2 · Tracking force: exactly how many grams
Tracking force is how hard the tip presses into the groove, and it’s set by the cartridge maker, not by a general rule. Most domestic cartridges work between 1.5 and 2.5 grams. Find the exact figure in your model’s spec sheet and, if you’re given a range, start in the upper half of it: counterintuitively, too light does more damage than slightly too heavy.
Too light, and the stylus loses contact on high-amplitude passages: it bounces inside the groove, distorts on loud vocals and can skip outright. Every bounce hammers the groove wall, so an under-weighted stylus damages vinyl faster than a properly loaded one – this is what people mean by mistracking. Too heavy, and wear accelerates, the highs dull off and the coil runs warm.
You set it with the counterweight at the back of the arm. The procedure is always the same: with the cueing lever down and the stylus guard removed, slide the counterweight until the arm floats level with the platter, tipping neither way – that’s your zero. Then set the dial to zero and turn it to the figure you want. And here’s the tip that genuinely matters: verify it with a digital stylus gauge, the $12-to-$25 kind. The printed scale on the counterweight drifts over the years and can be several tenths of a gram off; measuring is the only way to know what you’re actually applying.
3 · Anti-skate: what it is and how to set it
Anti-skate is the most ignored adjustment of the three, which is odd, because you can hear its effect. As the record turns, friction between tip and groove drags the stylus along, and because the headshell on a pivoted arm is mounted at an angle (the offset), that friction turns into a force pulling the arm toward the centre of the record. Anti-skate is just a mechanism – a weight on a thread, a magnet or a spring – pulling the other way to cancel it.
Leave it unset and the stylus presses harder on the inner groove wall than the outer one. The result has three recognizable symptoms: the right channel sounds dirtier and more distorted than the left, the stereo image drifts off centre, and both groove and tip wear unevenly.
To set it, start by matching it to your tracking force: if you’re tracking at 2 grams, set anti-skate to 2. That’s a very good approximation and it’s all most systems need. To go further, the classic method uses a record with one blank, ungrooved side: lower the stylus onto the smooth surface with the platter spinning and adjust until the arm drifts neither inward nor outward. Then there’s the by-ear method many technicians actually use: play a female vocal at a loud passage and adjust until it sounds equally clean in both channels.
VTA and azimuth: the two fine adjustments
With those three done you’re at 95 % of what’s available. The remaining two are only adjustable if your arm allows it. VTA (vertical tracking angle) is set by raising or lowering the arm base, and the correct starting point is with the arm parallel to the platter while the stylus rests on a record. From there, raising the back brightens the highs and sharpens transients; lowering it darkens them and thickens the body. With MicroLine or Shibata tips this adjustment matters far more than with a conical, because their contact line is long and its orientation counts.
Azimuth is how perpendicular the tip is to the record seen head-on: if the cartridge leans, channel separation degrades and the stereo image loses focus. Check it by looking at the body straight on at platter level; on arms that allow it, you correct it by rotating the headshell.
How long a stylus lasts
Stylus life is measured in playing hours, not in years, and it depends mostly on the tip profile: 300 to 500 hours on a conical, 300 to 800 on an elliptical, and up to 2,000 on a MicroLine. What shortens those figures most isn’t playing time, it’s dirt – every dust particle trapped in the
groove is an abrasive the tip drags across under pressure, so cleaning your records extends the life of both – there’s more on that in the guide to preserving your vinyl collection.
Since you’ll replace the stylus several times over the life of a cartridge, that subject has a guide of its own, with the hours by profile, the signs that give away a worn tip and a way to check without a microscope. If what you need to know is how often to replace the stylus, start there.
Five mistakes when changing a cartridge
- Tightening the screws before aligning. Alignment happens with the screws loose, sliding the cartridge; tighten first and you’ll be starting over.
- Pulling the tags by the wire. The four leads (red and green for the right channel, white and blue for the left) come off by gripping the metal tag, never the wire: it’s hair-thin and snaps without warning.
- Trusting the counterweight scale. It drifts with age. A cheap gauge buys you certainty for the life of the turntable.
- Buying a MicroLine and eyeballing the setup. That’s money thrown away, and a misoriented line contact wears the groove faster than a conical.
- Swapping the cartridge and changing nothing else. A new cartridge almost always weighs differently, so it needs new tracking force, new anti-skate and ( if its height differs ) new VTA.
One more precaution that isn’t an adjustment but saves grief: never touch the tip with your fingers. Clean it with a carbon-fibre brush, always in the direction the groove travels ( back to front ) never against it and never sideways.
Frequently asked questions
How many grams should the tracking force be?
Whatever the cartridge maker specifies, which for domestic cartridges is usually between 1.5 and 2.5 grams. If you’re given a range, start in the upper half. And check it with a digital stylus gauge: the printed scale on the counterweight drifts over time and can be several tenths off.
Is the difference between a conical and an elliptical stylus really audible?
Yes, and it’s the easiest of all upgrades to identify. You hear it in two places above all: in the highs, which come out cleaner, and at the end of each side, where a conical starts distorting and an elliptical holds together. It’s also the best value, because on many MM cartridges you only need to buy the elliptical replacement stylus.
Can I use an MC cartridge with any amplifier?
No. A low-output MC puts out 0.2 to 0.5 mV and needs a dedicated MC phono input with around 20 dB more gain. On a standard MM input you’ll hear a faint whisper. Your options are a phono stage with an MC input, a step-up transformer, or simply a high-output MC (around 2 mV), which does work on an MM input.
How often should I replace the stylus?
Every 300–500 hours for a conical, 400–600 for an elliptical and 800–1,200 for a MicroLine or Shibata. At an hour of listening a day, that’s roughly a year for the first and two to three years for the last. Don’t count it in years, count it in hours – and replace early if sibilance or inner-groove distortion shows up.
What is anti-skate and what happens if I don’t set it?
It compensates for the force that pulls the tonearm toward the centre of the record through groove friction. Left unset, the stylus presses harder on the inner groove wall than the outer: the right channel gets dirtier, the stereo image drifts off centre, and wear becomes uneven. As a starting point, set it to the same value as your tracking force.
Is it worth upgrading the cartridge on a cheap turntable?
It depends which kind. On a suitcase deck or anything with a ceramic cartridge, no: it lacks the necessary adjustments, and the money goes much further saved towards a better turntable. On an entry-level deck with a magnetic cartridge and an adjustable arm, fitting an elliptical replacement stylus is usually the most cost-effective thing you can do to it.
Can I replace just the stylus instead of the whole cartridge?
On nearly all MM cartridges, yes: the stylus sits in a removable assembly that pulls gently forward off the body. It’s the normal way to do it and costs considerably less than a new cartridge. On low-output MC cartridges you can’t – they have to go back to the maker for retipping, or be replaced.
To sum up what matters: pick the type your phono stage can actually feed, spend on the tip profile before the badge on the body, and give half an hour to the three setup adjustments. That last step is free, and it’s the one you hear most.