The upgrade that improves home theater sound the most won’t cost you a new speaker. It’s taming room reverberation until the RT60 sits between 0.2 and 0.4 seconds, the range where dialogue stays intelligible and effects sound tight. And the honest first move, before you spend a cent on panels, is to measure how much your room reverberates, because that single number decides whether you need treatment at all, how much, and of what kind.
Most guides reduce home theater acoustic treatment to covering “15 to 25% of the walls” by eye. That shortcut is fine to get started, but it can leave the room dead and lifeless or, the other way round, still booming after you’ve paid. Here you’ll see how to measure RT60 at home (with your phone or a mic), what target to aim for, and how to turn that measurement into how many panels to hang, how thick, and where, before you touch the receiver’s calibration.
Measure before you buy: what RT60 is and how to measure it at home
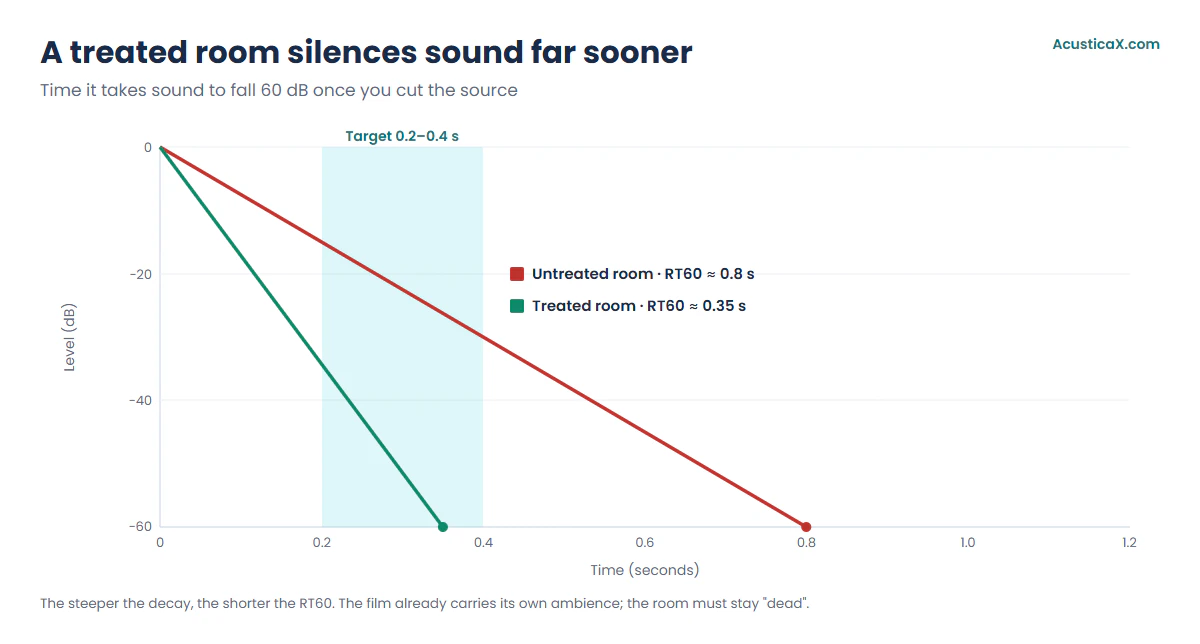
RT60 is the time it takes sound to fall 60 decibels once you cut the source, and it’s the number that sums up how a room reverberates. An untreated living room usually lands between 0.6 and 1.0 seconds; a well-treated theater, between 0.2 and 0.4. That gap is what separates clear dialogue from a “hello” that smears against the walls. Measuring it before you buy anything tells you whether you actually have a problem and how big it is.
What RT60 to aim for in a home theater
Aim for a mean RT60 of 0.2 to 0.4 seconds for home theater and critical listening. The European recommendation EBU Tech 3276 sets exactly that range (0.2 < T < 0.4 s) for listening rooms, and it uses the ITU-R BS.1116 formula as a guide, T = 0.25 · (V/100)1/3 seconds with volume V in cubic meters, averaged from 200 Hz to 4 kHz. That gives about 0.2 s in a 50 m³ room and 0.25 s in a 100 m³ one. One caveat: these standards describe reference rooms (the ITU asks for 20 to 60 m², the EBU a minimum of 40 m²), usually bigger than a living room, so treat it as the target to approach rather than a pass-or-fail exam. The underlying logic is that the film already carries the reflections and space the director intended, so the room has to stay fairly “dead” and not add ambience of its own.
| Room type | Target RT60 (mean, 200 Hz–4 kHz) | Reference |
|---|---|---|
| Listening or reference theater room | 0.2-0.4 s | EBU Tech 3276 · ITU-R BS.1116 |
| Multi-use living room with a theater | 0.3-0.5 s | common practice |
| Untreated living room (the starting problem) | 0.6-1.0 s | typical domestic measurement |
How to measure RT60 at home, with your phone or REW
You measure it two ways, and both are good enough to decide. The quick one is the impulse method, a sharp hand clap or a popped balloon at the listening seat while an acoustics app times the decay, which gives you a rough idea in a minute. The precise one uses a frequency sweep and a microphone, with the free Room EQ Wizard (REW) software and a measurement mic such as the UMIK-1, and it gives you RT60 per frequency band, which is what really matters.
If you don’t own a mic or feel like installing anything, your phone is enough to start. Our tool to measure your room’s real RT60 with the microphone runs the sweep, works out RT60 per band, and tells you whether your room is dry, right, or reverberant. Two honest warnings: the absolute dB level from an uncalibrated mic is only indicative (RT60 and modes, being measurements of time and frequency, do come out reliable), and a phone mic loses sensitivity below about 100 Hz, right where the modes live, so the reading there is approximate. Check too that automatic gain control is off, since it distorts the decay.
Estimate before you measure: room modes and theoretical RT60
Even before measuring you can forecast from the room’s dimensions alone. Feeding length, width, and height into a calculator that estimates your room’s RT60 and modes shows where the problem frequencies will land (the room modes, which make one bass note boom louder than its neighbors) and what RT60 you’d get for a given amount of furniture. The math uses Sabine’s formula, RT60 = 0.161 · V / A, where V is the volume and A the room’s total absorption. That same formula gives the 0.6-1.0 s of an untreated room: an empty room absorbs little (coefficient ≈ 0.12, near 1 s) and a furnished one somewhat more (≈ 0.20, around 0.6 s). Estimate first to know what to look for, measure afterwards to see reality, and decide the treatment between the two.
How home theater acoustic treatment works
What you hear on the sofa is the sum of the sound coming straight from the speaker and the sound bouncing again and again off walls, ceiling, and floor. Those early bounces arrive up to about 15 milliseconds after the direct sound and are the ones that muddy voices and blur where each effect comes from; ITU-R BS.1116 recommends attenuating them by at least 10 dB between 1 and 8 kHz, which is exactly what a panel at the reflection point does. Reverberation is the long tail of all those bounces together, and room modes are the low frequencies that reinforce or cancel depending on the room’s dimensions.
Three things live together in any living room. Early reflections, which you attack with absorption at the first reflection points. Mid-band reverberation, which you bring down by spreading material around the room until you hit the RT60 target. And the low-frequency modes, which thin panels won’t fix, because they depend on geometry, on where you sit, and on subwoofer placement. If your boom shows up only on certain notes and not across the board, that’s a mode, and the fix runs through seating and bass traps more than through treatment (we have a separate guide on where to place the subwoofer).
Absorbers, diffusers, and bass traps
Good treatment mixes three kinds of piece and overdoes none. Absorbers (mineral wool or fiberglass panels) remove energy and lower RT60; diffusers scatter the sound without deadening it, and earn their place mostly on the rear wall to keep a sense of space; bass traps, thick and in the corners, tackle the boom below 100 Hz that no thin panel touches. One important warning before you buy: panels absorb sound inside the room, they don’t soundproof it against the neighbor. That job needs mass and decoupling in walls and doors, not porous panels on the wall. The classic mistake is to blanket everything with thin absorber and expect it to fix the bass: the room goes dead in the highs and keeps booming down low. A multi-use living room rarely needs diffusers, but it almost always benefits from a couple of corner traps.
How many panels you need and where to put them
As a starting point, covering 15 to 25% of the wall and ceiling surface with absorber sets up a home theater well. But that percentage is an eyeball estimate, and the right move is to measure RT60, see how much you’re over the target, and add absorption until you reach it. If you measure 0.7 s in a 50 m³ room and want 0.35, you have to double the room’s absorption, roughly 12 square meters of material, on the order of 16 to 20 panels. With just 8 panels you’d land near 0.47 s, only halfway. That’s why you measure first and buy second.
How many acoustic panels do I need for a home theater?
It depends on the target, not on a magic number. The table starts from the coverage rules the material makers use (GIK, Rockwool, and the like) applied to a 4 × 5 × 2.5 m room: 20 m² of floor, about 65 m² of walls and ceiling, with 60 × 120 cm panels (0.72 m² each, roughly a 2×4-foot panel). Treat it as a launch point; the measured RT60 is what rules.
| Goal | Coverage (walls + ceiling) | 60 × 120 cm panels (room 4×5×2.5 m ≈ 65 m²) |
|---|---|---|
| Kill the echo, make speech clear | 10-15% | 9-14 |
| Balanced home theater | 15-25% | 14-23 |
| Dedicated or mixing room | 25-40% | 23-36 |
Where to place acoustic panels? The mirror trick
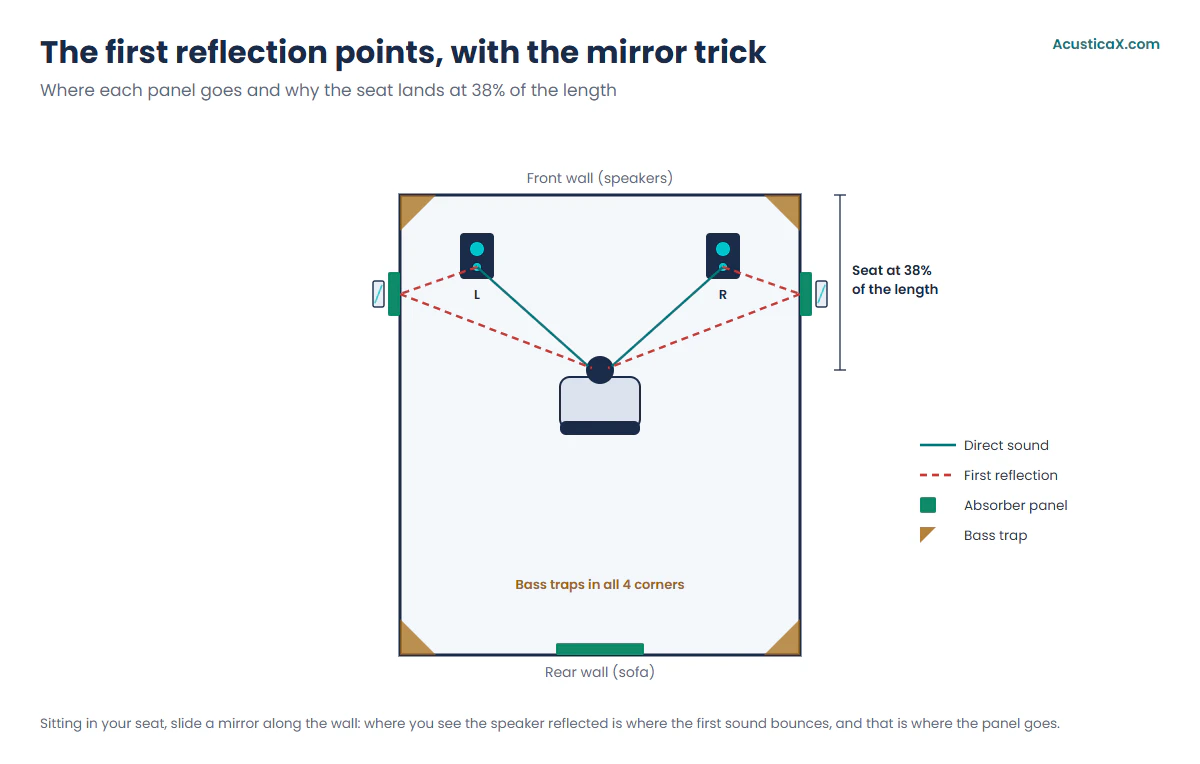
Panels go first at the first reflection points, and there’s a home method to find them exactly. Sit in your listening position, have someone slide a mirror along the side wall, and mark the spot where you see the front speaker reflected, because that’s where the first sound bounces and that’s where the panel goes. Repeat for both side walls, for the ceiling (mirror on the floor or on a pole), and put absorption on the wall behind the sofa too. The front wall, behind the speakers, takes absorption to clean things up, or diffusion if the room ends up too dry.
Thickness and frequency: why the bass needs thick panels
Thickness sets how low a panel reaches, and that’s the key that saves you from wasted money. A quick rule, f ≈ 343 / (4 · thickness), gives the frequency from which the panel works at its best, though porous absorbers start working somewhat below that. The published coefficients of rigid fiberglass (Owens Corning 703 mounted on the wall, with equivalent Rockwool data) make it clear: a 1-inch (2.5 cm) panel already absorbs 68% at 500 Hz and 90% at 1 kHz, so it does control the highs and much of the voice, but falls short in the bass. A 2-inch (5 cm) one climbs to 86% at 250 Hz. For real boom, below 100 Hz, you need corner traps of 20 cm or more, membranes, or resonators. Hence the expensive mistake: filling the room with thin panels expecting them to kill the boom, when the boom is bass and a thin panel doesn’t reach it.
| Absorber thickness | Typical coefficient (rigid fiberglass on wall) | What it controls well |
|---|---|---|
| 2.5 cm (1 in) | α ≈ 0.68 at 500 Hz · 0.90 at 1 kHz | highs and voice; weak in the bass |
| 5 cm (2 in), or 2.5 cm + air gap | α ≈ 0.86 at 250 Hz · 1.0 at 500 Hz | highs and mids, down to lower voice |
| 10 cm (4 in) | α ≈ 1.0 from 250 Hz · starts at 125 Hz | mids and part of the bass |
| 20 cm or corner trap | reaches ~80-125 Hz | the low-frequency boom |
| Modes < 80 Hz | membrane or tuned resonator | the room modes |
Receiver setup and speaker placement
With the room treated, the receiver finishes the job, but the physical placement is on you and no calibration fixes it. Follow the ITU-R BS.775 standard for 5.1: fronts at ±30° from center forming a triangle with your seat, center channel at 0° at ear height, and surrounds at ±110°, slightly above the ear. Put the seat at around 38% of the room length measured from the front wall, a spot where bass modes tend to bother you least (the room calculator marks it for you). Never jam the sofa against the rear wall, because the bass spikes there.
The crossover with the subwoofer works well at 80 Hz for satellite speakers, the figure THX recommends, going higher if they’re very small. Watch the phase between the sub and the fronts, and if you run larger tower-style speakers, you may not need to cross them over that high. Don’t get fixated on the number, though: it’s worth understanding the old 80 Hz subwoofer myth before taking it as gospel. A soundbar with a subwoofer like the Sennheiser Ambeo Mini handles that crossover on its own. The receiver also applies delays to align the arrival of the sound from each channel at your ear, which is what makes the front stage sound cohesive.
Center channel and dialogue clarity
The center channel carries almost all the dialogue, so it’s the one that feels treatment and placement the most. Put it as close to ear height as you can, with no furniture in front filtering the voices, and don’t bury it inside a closed cabinet. If voices sound muffled, before touching the equalizer check that there isn’t a strong reflection off the ceiling or the coffee table right in front, because that smears the consonants more than any tone tweak. A panel or a runner on that table often does more than adding 3 dB of treble.
Calibration, measurement, and testing tools
Automatic receiver calibration and a mic measurement complement each other. Factory systems, Yamaha’s YPAO or Audyssey on Denon and Marantz, set levels, distances, and a room EQ in a few minutes. There are also external ones, paid like Dirac Live or a free download like Anthem ARC Genesis (with compatible hardware). They’re great for the bass and for matching channels, but they correct from wherever you’ve placed everything; they don’t replace treating the first reflections or getting the speakers in the right spot.
Real-world testing, equalization, and ear verification
After calibrating, check with your own material. A cheap sound pressure level (SPL) meter or your phone works to match channels to within 1 dB of each other; a UMIK-1 measurement mic with REW shows the real response. In EQ, cut before you boost, because it’s cleaner to knock down a mode’s peak than to lift a dip, and notch filters are made for that. If you come from the music world, the equalizer settings by genre follow the same logic. And remember that chasing a flat response with EQ won’t make up for a reverberant room, because the high-frequency detail is lost all the same if reverberation buries it.
Frequently asked questions
How do I measure RT60 at home?
Two ways. The quick one is a sharp clap or a popped balloon at the listening seat while an app times the sound’s decay. The precise one uses a frequency sweep with a microphone and the free REW software, which gives RT60 per band. With your phone and our room-measurement tool you have enough to decide whether you need treatment, bearing in mind that below 100 Hz a phone mic is only indicative.
What RT60 should a home theater have?
Between 0.2 and 0.4 seconds on average (measured from 200 Hz to 4 kHz), per EBU Tech 3276 and the ITU-R BS.1116 formula. Those standards describe large reference rooms, so in a normal living room it’s the target to approach. A multi-use living room sits fine between 0.3 and 0.5 s; above 0.6 s dialogue starts to smear.
Do acoustic panels block the neighbor’s noise?
No. Panels absorb sound inside the room and cut the echo, but they don’t block noise coming in or going out. Soundproofing, so the neighbor can’t hear you, is a different job that needs mass, decoupling, and airtight walls and doors, not porous panels hung on the wall.
How many acoustic panels do I need?
As a launch point, covering 15 to 25% of walls and ceiling sets up a home theater well, roughly 14 to 23 panels of 60 × 120 cm in a room with 65 m² of surface. But the exact figure comes from the measured RT60: going from 0.7 to 0.35 s in 50 m³ means doubling the absorption, on the order of 16 to 20 panels.
How thick should an acoustic panel be?
It depends on which frequency you want to control. A 2.5 cm panel already absorbs 90% at 1 kHz and works for highs and voice; a 5 cm one reaches 86% at 250 Hz; and for the boom below 100 Hz you need corner traps of 20 cm or more. Thin panels won’t fix the bass no matter how much wall you cover.
Where do acoustic panels go?
At the first reflection points on the side walls, the ceiling, and the rear wall. The mirror trick pinpoints them: sitting in your seat, mark where you see the speaker reflected on the side wall, and the panel goes there. Corners are reserved for bass traps.
Can I measure the room acoustics with my phone?
Yes, and for RT60 and modes it’s reliable, because they’re measurements of time and frequency. The absolute dB level from an uncalibrated phone mic is only indicative, and below 100 Hz it loses sensitivity, but reverberation and problem frequencies come out well. It’s enough to decide what to treat and to check the before and after.
What is the 38% rule?
It’s a guideline for placing the seat: putting the listening position at around 38% of the room length, measured from the front wall, tends to land in a spot where bass modes bother you least. It’s a starting point; it’s worth fine-tuning by measuring, because every room has its own frequencies.